
Plantaform
While I’m not affiliated with the company in any way, I do own a Plantaform and am very pleased with it. While the company has a number of materials to try to help you get the hang of it (paper documentation, website, app, videos), I find it a bit disorganized, and the most important parts aren’t well emphasized. This is also a review and discussion of the technology of sorts, to help prospective buyers know what they’re getting into!
First discussions
-An important setup step when you’re first getting everything set up is to make sure the column is screwed in correctly to the top, and that the top tank drain hose isn’t bent or blocked up in any way. Otherwise, the fog won’t flow correctly, and you’ll have problems.
-The pods come with rock wool. I did the first trial this way, and it worked fine (except the parsley fell through the hole!), but for the second time I experimented with peat based growing media. The peat is rather loose, so you have to pack it in a bit, but it worked. A tip for that is to keep some extra on hand, since the peat based media tends to shrink a bit when it’s wet, so you can make sure the pod is full.
-Plantaform has some guidelines for water, which are fine but a bit incomplete. They say you can use tap water provided it doesn’t have too many minerals, but they don’t mention anything about Chlorine. Most tap waters are chlorinated or otherwise treated. Plant will grow with a bit of chlorine, but it tends to burn the roots, and they don’t grow as well. So if using tap water, I would recommend either letting it sit in a bucket with the lid off for a day or so, or using aquarium dechlorinator (I use Aquasafe), so the water is easier on the plants. No matter what, you’re going to get mineral build up on the unit (the foggers work a bit like an ultrasonic humidifier), so you shouldn’t worry about minerals too much!
-If you live in a dry climate like I do, it causes additional problems for germination and growing of certain plants. The germination domes, and the plantaform itself increase humidity to help germination and growing, but they can only do so much! So I find that having a humidifier setup helps to improve the likelihood of germination, and keep the humidity at the desired level. You can ignore this if you live in a humid climate, however!
Basic setup steps
-
Make sure the column is screwed in correctly, and the top tank drain hose is in the correct position and able to drain.
-
Take the pods and fill them with soil substrate. If a loose substrate like peat, take some extra with you when you go to soak them. I use the box the pods came in to hold them for this step.
-
Prepare a 5 gallon pail of water, either by leaving it out for 24 hours with the lid off, or by adding aquasafe to dechlorinate. Fill a smaller container you don’t mind getting dirty with some of this dechlorinated water.
-
Immerse the pods in the water in the smaller container for 10 seconds, then set aside. If the media shrinks too much, you can add more then re-immerse
-
Add the seeds. It is important to be careful for this step, because the seeds might fall out and fail to germinate if they are not in there well enough, and each seed has different germinating conditions it’s important to observe. I use a small probe to push seeds that need to be immersed in the soil down further. I wet the pods then add seeds, because a lot of seeds will float, and I don’t want to lose them!
-
Cover with germination domes, then put in the unit. I mark what each seed is with a sharpie on the white covers, since otherwise it’s hard to remember what you planted where.
-
The basic recipe for the large tank (7 litres) is 5 grams, and the top tank (2 litres) is 2 grams. That’s approximately the full scoop for the large tank, and up to the 2g line for the small tank. You can buy their nutrients, but there’s probably no advantage to doing this vs buying hydroponic nutrient mix from another supplier. I’ve not tried the other, but they look identical. Fill the top and bottom tanks
-
Once unit is turned on and set up, select the appropriate pack in the app, and advise the app you filled the water by pushing the green button at the bottom of the water section of the app.
-
If in a dry climate, at least when germinating run an external humidifier. Most commonly grown plants need at least 50-60% humidity when germinating. The domes can help, but at least where I live they were not enough to ensure the germination of every plant. This humidity level is good for most plants to grow during the entire growing cycle though, so there’s no harm in running the humidifier full time when using the Plantaform. I set my humidifier to 50%.
Tear Down
Plantaform’s social media presence is very controlled and private. They won’t let you join the Facebook group unless you have purchased one (you need your order number), and they aren’t very active on posting (they are good at answering questions though, usually within a day). There’s some generic reviews online, but no tear downs or analysis of what makes it tick. So that’s why I’m doing it here.

Fogging device
As you see in this picture, there are three fogging components located in the bottom/middle of the unit. The water in this section is contiguous with the water in the rest of the base through small holes (to help prevent roots from growing into the fogging section and disrupting it). These components look a bit like what causes humidification in ultrasonic humidifiers, so I suspect that’s what they are. Usually in a humidifier you just have one, but here we have three, but I suspect that’s because their effectiveness is related to depth. On humidifiers you have a precisely controlled depth of water through various means, but because here the water varies in depth over time, they just duplicated the mechanism three times so there’s always at least one at a reasonably good level. I suspect that they also use these to estimate depth based on resistance to electrical current of the components, but I have no way of backing that up.

Centre column
The purpose of the centre column seems to be solely to prevent roots from growing into the fogging area, and preventing fog from being able to be pulled up into the top, to then descend down. There’s no moving parts here, and the column is not totally blocked off from the rest of the machine, so roots can grow into the corners a bit. Still, it works quite well. You see here that once roots attach to the column, you can get them off, but the surface is permanently altered and hard to clean. Since it’s not visible, not a big deal anyway, but worthy of note.


Fan/computer housing
The section at the top is accessible by removing a number of torx screws from inside the unit. The top section is also held in by friction, so even after removing the torx screws, you still have to work it up a bit to get it out. The plastic cover comes off, leaving all of the components inside. From up here, you see the backup tank, the three fans, and the CPU. The top tank just fills the bottom when it gets too low, there’s no other apparent mechanism. The three fans you see here have three purposes. The middle most fan, and the smallest fan, blows out of the unit. This pulls up the fog after it is created, so it is off unless fog is being made. The larger fan next to it actually blows into the unit, this redirects the fog to the roots and the growing chamber, and again only runs when fogging. The outermost fan appears to be a dehumidifying/drying fan. It blows outwards as well, doesn’t run if the unit is dry enough, but runs constantly if humidity is relatively high (As I like to keep it, particularly during germination).
The CPU has a pretty straight forward design, mostly darlington type transistor control boards for the fans, lights, and foggers. There’s a multicolour LED on the board that transmits it light via a piece of transparent plastic to the button, and a small tactile switch surface mounted that is pushed via the transparent plastic when you push the button. The board has standard molex type pin connectors for all the components, that are easy to put on or take off. The board also has a small wireless (wifi) modem, which is how it communicates with the App. The unit is relatively autonomous from the app though - it runs and does its thing, and the app just tries to touch base and see how things are going for the most part. If you unplug the unit, everything turns off immediately, but soon after plugging it back in, the lights, the fogging, get back up and running as they should.

Cleaning
Plantaform advises you can use dilute hydrogen peroxide to clean every three months, but vinegar every 6 months. Since peroxide degrades though, and it doesn’t remove mineral scale well, I would rather advise to just use vinegar every three months. I found that there were parts where the roots or part of the plant touched the white inner plastic, and left them brown looking. Since I don’t like magic erasers (too much microplastics I don’t want to eat), I just used some chalk and gently rubbed with my fingers and chalky water until they looked better.
Given my experience with the chlorine, I didn’t want to leave a lot of vinegar residue either for the next time I plant. The quick clean setting advises you to fill the unit with diluted vinegar, then run it. Once finished running, you drain the vinegar, fill with water, then drain it again to get rid of the vinegar. I did this, but it left it rather uncomfortably vinegar smelling still. So I filled it with clean water, ran the quick clean again, then drained that water. It still smelled a bit like vinegar, but not so bad. Then I let it air out for a few days, and didn’t plant again until it stopped smelling like vinegar. I’m not sure this is totally necessary, but that seemed right to me, and it seemed to work.
When I set up, it seems to take about 1.5 hours to get everything done. The slowest parts are filling and treating the water, putting the soil and seeds in the pods, wetting them, and putting them in the machine. The teardown after the first harvest with my daughter took about two hours. This included separating out all the good plant material from the waste/compost (about 1 hour), and cleaning/whitening all of the components (I only whitened/cleaned with chalk the parts visible on the inside. I washed all the components with soapy water as well, then rinsed them. Once dry, I stored everything in the included bags until the unit no longer smelled of vinegar.
Future Improvements
I read on the Plantaform Facebook page that there’s some updates on the most recent firmware update, which I’ll try to do at some point. I found that setting the time it lights up and lights down is tricky, and it doesn’t exactly start or stop at the times you “set.” Maybe that will be improved.
In some ways the “set and forget” nature of the existing programs works pretty well, but there are times I’d like to be able to control things manually. For instance, if all the plants have germinated, manually switch to growing mode, or make it so the lights are still on, but not so bright, manually switch to night time mode, manually start the lights early if I wake up early (it’s in my bedroom), if it’s a dry spell, manually set the fog to happen more often than normal, etc. At the moment, all those things are inaccessible, so you have to sort of let the machine do its thing. That’s part of why I want to develop an open source control board, but I’m not there yet!
Another improvement would be to have darker shades. The shades already look pretty dark, but the lights during the day are extremely bright, such that if you don’t have the unit angled right, you can get some direct light in your eye, and its bothersome. Part of me has thought to spray the insides with a metallic primer, then white paint (to make it as dark as possible outside, while still reflecting the light inside), but it’s nice to still be able to see into it at times! I’d have to get another set of shades to do that. Another option would be just to super tint one or two of them, the ones that tend to point toward you while you are in the room with it.
One mod I’ve considered making is to put some diffuser panels on the lights. The reason for this is the LEDs are painfully bright a lot of the time, and they shine directly into your eyes depending on the angle. The other is that as it is, it encourages plants to grow right up to the panels. Getting diffuser panels of the right size wouldn’t be difficult, but my concern would be heat dissipation, and undesirable reduction in light intensity. But it’s something to consider.
Specific Plant Matters


Wind - For those of you that are familiar with tomatoes, you know that if you try to grow them indoors, they tend to get “leggy,” which is to say the stalk isn’t very strong, particularly at first, and they fall over or blow over easily. This is because they’re not exposed to any wind. Well, in the Plantaform all plants end up like this. It’s such that I’m planning on getting a small fan, take off the doors across from each other, and having it blow across to help prevent it.
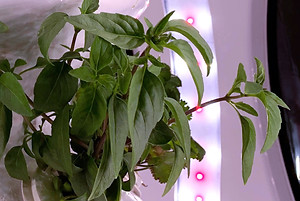
Basil - The herb basic package has basil in it. This is one of the best plants it has for the plantaform, you get loads of tasty basil over the course of three months. That being said, you get it mostly for two months, the last month or so there’s not much left unless you were really conservative in picking it. It is placed at the top, but I don’t think it’s because it needs it so much as it will grow and obscure the other plants if you don’t. Again, with no wind, the stems get pretty brittle, and tend to break if you’re not too careful. The basil will grow right up to the lights, blocking them out to the other plants, and tending to burn the leaves that are too close. They advise trimming it fairly short as soon as it sprouts, and this isn’t a bad idea, but it still grew thick brittle stems over time.
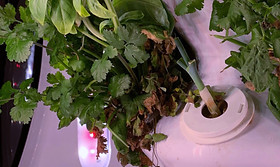
Cilantro - this was probably the most successful herb of the basic herb pack. It grows thick, and it grows well, and in fact it’s hard to eat enough cilantro to keep it well trimmed! It also developed thick roots with black soil like slime on them, which caused it to outcompete the other plants a bit. You could really plant these anywhere in the space, they grow bushy, but not usually big enough to interfere with other plants much.
Thai basil - this one also did very well, and didn’t grow too big. The roots were also somewhat dominant like the Cilantro. This one went all the way to flowering after about 1 month. If they’re not trimmed back they tend to encroach a bit on other plants, but not too much, and mine were bushy like the cilantro. Our main problem is we don’t have many recipes with it! It’s great for Pho or Pad Thai if you eat that a lot though.
Oregano - This was the poorest performing of the herb pack, and I’d say that it probably makes sense to change it out with something else unless you’re really an oregano fan. Oregano is easy to get dried, and in my opinion, there’s not much benefit to having it fresh like the other options here. This herb grows more slowly than the others, and even after three months, I had at most twenty or thirty leaves on the one that did the best. I never harvested it, and I never used it, because I didn’t want to kill the plants! One of the three plants that germinated burned and turned brown somehow (I suspect related to chlorine in the water, or mold), but only toward the third month. In retrospect, I probably should have harvested some leaves, but honestly this plant isn’t a good return on the investment of trying to grow it.
Parsley - I tried to grow the parsley that came in the pod pack, but it never materialized! One reason I think this happened is that I put all of the seeds for all three pods in the hole in the middle of the rock wool. Then when they got wet, I think they somehow migrated out of the rock wool and ended up in the water tank at the bottom. Two or three times, I saw what looked like a little seed with two little green shoots coming out of them floating on the water. Otherwise, nothing ever happened. So for this one, if you’re using rock wool, make sure the seed is embedded in it, not anywhere near a hole or somewhere it may fall out.
Green onion - Since my parsley never materialized, I ended up with three empty pods for most of the first grow. After seeing a picture online of a green onion grown this way, I decided to give it a try. It was easy to put in there, remove the pod, make a bit of a hole for the root/bulb section of the green onion (scallion), put it inside, then pop it in. The onion grows to full length in about a week, and in my case the one I planted gave me three full lengths (three weeks) before it was overcome with mold and wouldn’t grow much anymore. Still, it was pretty much a success. I think that growing chives would in general be a better fit for this device though.
Current loadout - while I like the standard herbs, I’m more of the adventurous type. So for this loadout I’ve put together a selection of unusual Japanese herbs, in particular Yomogi, Shiso, Wasabina, Mitsuba, and Kawamidori. I’ll update once I know how they did!
Overall Impression
So overall, I think it’s a great unit, with a lot of potential to be even greater. I’m the kind of person that struggles to do anything other than over water or under water any plants, and this machine helps to get rid of both those problems. When the water refill alert comes on, you still have two or three days to actually do it, which I think is wonderfully flexible. Otherwise, you basically just refill it weekly, which isn’t that hard for most people to do. The instructions in the box work for most things, but as mentioned, there’s a number of tips you pick up if you really want to optimize things. The fact that the board is easily replaceable makes this a solid investment - even if the company goes belly up like most of these companies do after a couple of years, there will probably be a modding community (among them myself!) ready to print/sell you a new board once it does. The fog generators look to be pretty sturdy, LED lights aren’t that hard to come by, and the fans can probably be easily user replaced with standard ones you can order from Mouser or Digi-key, so this is a platform that you’ll probably be able to keep alive like the ship of Theseus forever. There’s other potential for extension too, among them custom centre columns so you can accommodate larger plants like beans, cucumbers, etc. If you’re really nerdy, then with a custom 3D printed pod and a custom centre column it might even be able to grow root vegetables like carrots or ginger.